With string and circle stickers, you can create simple and gorgeous party garland.
Cascade, Roses
Paper Flower, Paper Garden
Button-Collared
Crochet Boy
Current Projects In-Progress
Red
A Leather Clutch
Custom Crowns
I recently completed a custom order for a Pastor in Chicago who contacted me
. Her church is working on an Easter play, and she wanted a few paper crowns made that could rest on pillows. The crowns needed to sturdy and glittery, and in colors of biblical royalty (gold, silver, purple).
Here's what I made:
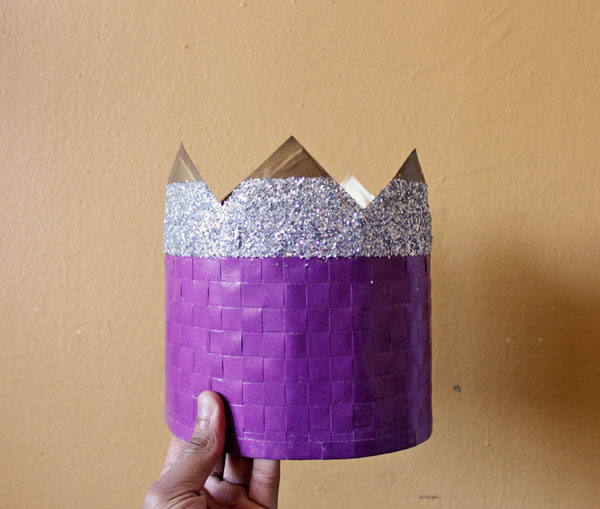
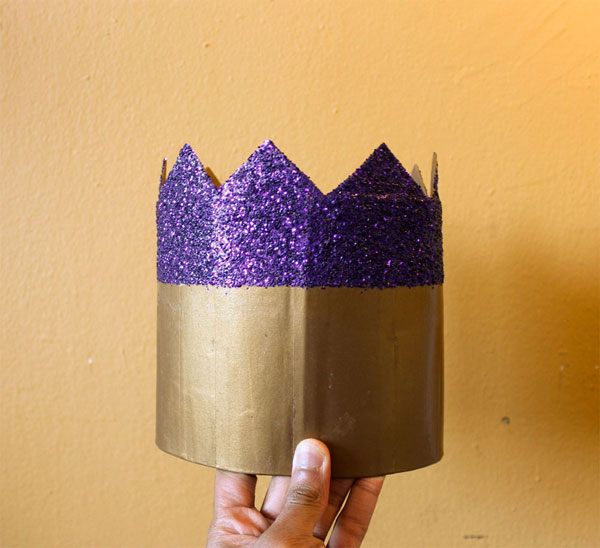
I used recycled cereal boxes as the base for these crowns, then decoupaged them with gold and purple paper purchased from
. Here is how one looked pre-decoupaged:
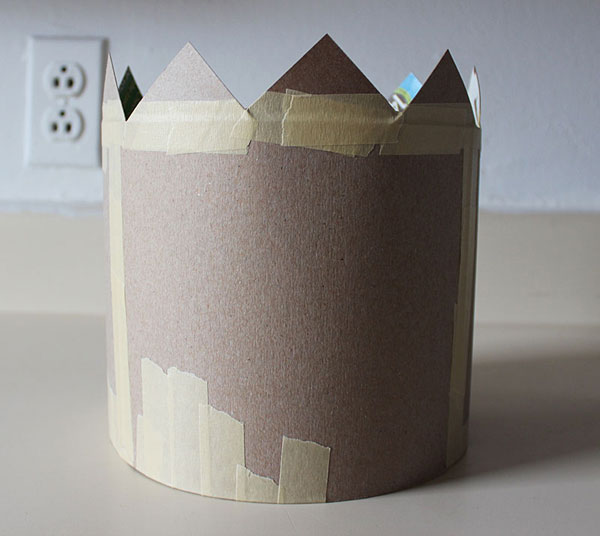
I then added glitter by using painter's tape to separate the area that I didn't want glitter applied. It created a nice, color-blocked effect. Finally, I applied an adhesive (one with
, the other with
) on the outside as a sealant and protectant. I actually prefer Modge Podge over Paper Source's PVA glue because it leaves a flat, matte texture without any stickiness. It was good to experiment, though.

Check out
for more handmade goods, and vintage goods, too. If you would like to make your crowns, take a look at the tutorials
and
. You can also contact me for a custom order :)
Clothesline
Kindness and Secret Philanthropy
Now more than ever, we need to be kind. We need to show compassion daily. We need more love in this world. We cannot become hardened to tragedy. We must all have a mother's spirit when an innocent person dies, when our children are forced to bear the burden of adult pain.
I have been grieving over the victims that died in Newtown, Connecticut. The innocent babies, their laughter and wide-eyed wonder gone. Why? Why do people do bad things? Why do we do bad things? What small and big moments lead us to evil?
I don't know but I'm sad and confused over this, and all I can grasp right now are the words of wisdom that I hear echoing in my head:
We must be kind. We must show compassion, and be standards of positivity. We must work to support each others' brilliance, and the differences that often cover and support it. We must edify each other constantly, even if we don't understand. We must hug and love freely, and practice empathy until it becomes an instinct. There are too many people in this world for anyone to feel alone, and life can end too soon.
I don't do enough. I don't give enough or smile enough or love enough. I am not as free as I could be, and the world is waiting. There is a piece of God missing, and it is because I am afraid to let it loose. We must all work hard to not be afraid. We must let our truths fly. The universe's interdependence cannot be taken lately. We all really do need each other.
------------
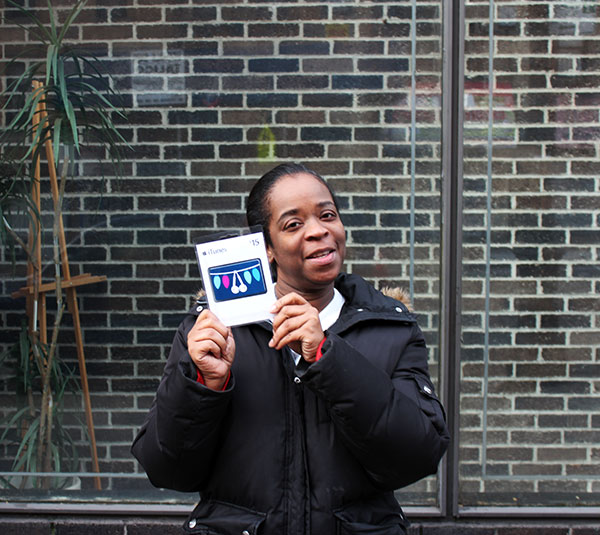
In the spirit of giving love, I was recently given an amazing opportunity by Etsy to do something philanthropic and wonderful. Inspired by The Secret Society for Creative Philanthropy, they gave me $100 and told me to use it in a charitable way for people I don't know. I could give it to a stranger walking down the street, or leave a bunch of $20 bills in random places. The choice was mine. I decided to break my $100 into smaller amounts, and incorporate my love of food, music and creativity into this project. I also wanted to stay within my neighborhood in the North Bronx. I truly love this neighborhood, and the people in it.
With $5, I bought a holiday card, and asked some of my fellow Etsy co-workers to write well-wishes to a random stranger. Then, I taped the card inside of a canopied bus stop in my neighborhood for someone/anyone/everyone to read and enjoy.


Then, I bought five $10 gift cards from my local grocery store. Along with these, I asked Etsy for five of their tote bags to give with the cards. There's really no need for plastic grocery bags, is there?


Next, I bought three $15 iTunes gift cards, and in of them put inside a paper with 15 of my favorite songs.


There were a few people who refused to accept these gifts. I understand. Many New York City residents are always on some level of defense. In this big city, we need to be. Nevertheless, kindness with no strings attached should still be spread freely. Caution and community can go hand-in-hand.
I'm grateful for the people that accepted my gifts. For a brief moment, they trusted a stranger. Perhaps they had faith that what I was saying was true, or perhaps they really needed money for food and had no choice but to accept a free grocery gift card. Perhaps they just needed a friend, or a happy, unexpected diversion from an otherwise confusing life, if only for a few brief seconds.
For whatever reason they chose to accept my gifts, giving made me feel good.


This project inspired something in me that I hope to grow. I aim to be a builder of hope, and aim to provide a safe space for kindness, even if it is with a smile or a listening ear. The world desperately needs it, and so do I.
A DIY Storage Frame
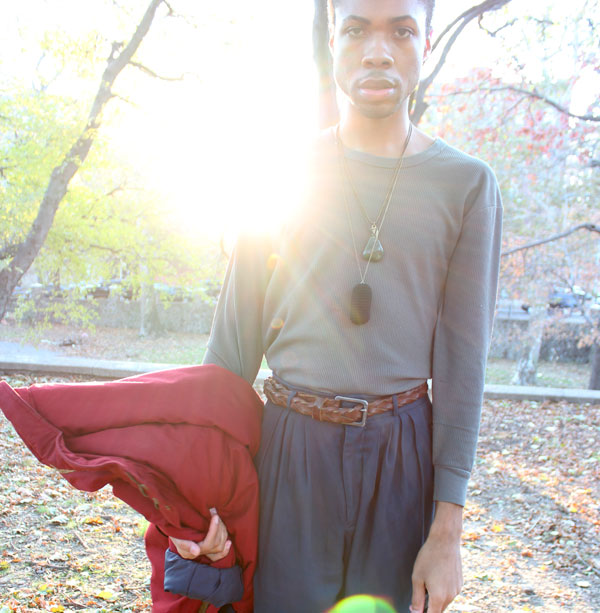
Pendant

I made this pendant. Do you like it? It's pitch black.

The yarn I used is a dark, dark black, so I had to overexpose my camera a little in order to show the stitches.

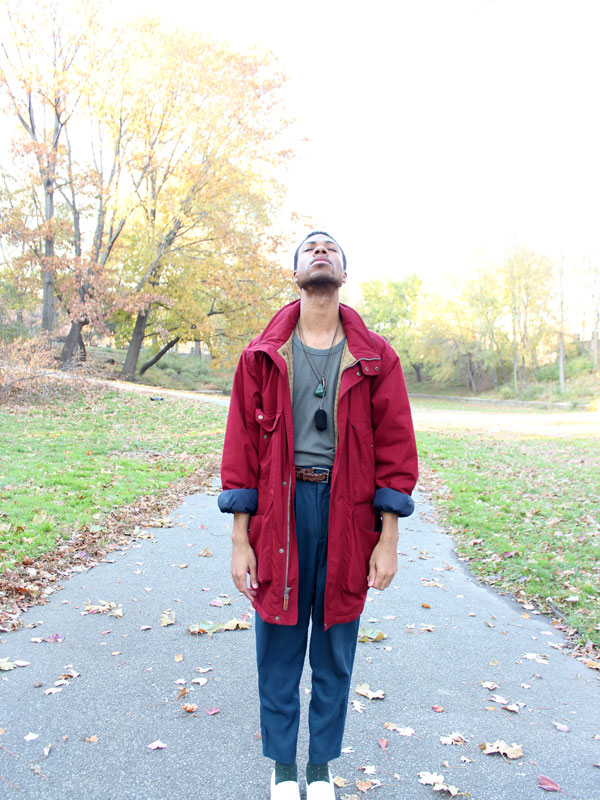
Cuffs make things better. They add intrigue.

I need a lot more tapered, high-water pants. I would exclusively wear them if I had enough...but what is enough?

- Coat: vintage from Atlantis Attic
- Shirt: a thermal from a random discount store in Washington DC, I think.
- Necklaces: the gold one is from BlackStar, the green one is from a store in U Street, Washington DC but I forgot the name and the black one is hand-crocheted by me (the chain came from a necklace I already had).
- Belt: thrifted
- Pants: thrifted
- Socks: Uniqlo
- Shoes: vintage from Vice Versa


Growing
The journey is far more important than the destination.

For a long time, I've been obsessed with goals, with meeting expectations and proving to people my worth. This year, these obsessions have slowly begun to peel off. Underneath the peels lay a soul that is stirring and filled with mystery. This is the real me.
Growing up, there was always an imaginary world in my head, a possibility of something and someone better, a craving to exist somewhere else, and be someone else. Honestly, this detachment often made living easier, but it also made me view my reality as inferior and something ugly. It wasn't ugly. It was truth, with all of its imperfections, simple wonders, chaos and confusion. It was something I needed to face. I coped with it, but I didn't truly face it. Even now, facing reality is difficult.

Still, the goal of a "something better" is peeling off. "Something is" is now taking its place, and I like this something. I appreciate the person that I am, and see its place in a society I still feel detached from. Perhaps, hopefully, inclusion will come. For now, the true self in me is coming to light. I am looking at it, and it is vulnerable and strong, wonderful and imperfect. It has a role here, in the here and now. It is still unfolding, and I appreciate the privilege of observing it. I cherish the "aha!" moments.
May I forever keep this childlike wonder. May I never be grown, but always growing.
This appreciation for growth is inextricably linked to the things I create. I am amazed at seeing my hands slowly form something. If I see progress, no matter how small, I can wait for it to fulfill itself. I have faith that it will fulfill itself, and this fulfillment leads to my own fulfillment.

Perhaps this is a little of what parenting is like, or what it should be like; an eternal patience. An understanding that the frustrated, little being in front of you is so beautifully unaware of itself, but yet is such a movement, such a force. Love had no meaning until this magical creation came and defined it. From now on, you are Mother or Father. You are redefined, never to be the same.
I wonder if this is what God, The Mystery felt when he and she created the world. I wonder if there was a moment when they suddenly became overwhelmed at the revelation that they would never be the same. They were now Creators, and the old things were now passed away. These small, fragile, erratic things they made now defined them, and thus an interdependence was born. The universe's first true circle, perhaps?
Creation is spiritual, no matter what it is that you are creating. In it lies the mystery of possibility, and possibility is where The Mystery dwells. Have faith that it's imperfect perfection will make itself known, and that you, the real you, will see it and never be the same.

Still, the goal of a "something better" is peeling off. "Something is" is now taking its place, and I like this something. I appreciate the person that I am, and see its place in a society I still feel detached from. Perhaps, hopefully, inclusion will come. For now, the true self in me is coming to light. I am looking at it, and it is vulnerable and strong, wonderful and imperfect. It has a role here, in the here and now. It is still unfolding, and I appreciate the privilege of observing it. I cherish the "aha!" moments.
May I forever keep this childlike wonder. May I never be grown, but always growing.
This appreciation for growth is inextricably linked to the things I create. I am amazed at seeing my hands slowly form something. If I see progress, no matter how small, I can wait for it to fulfill itself. I have faith that it will fulfill itself, and this fulfillment leads to my own fulfillment.
I wonder if this is what God, The Mystery felt when he and she created the world. I wonder if there was a moment when they suddenly became overwhelmed at the revelation that they would never be the same. They were now Creators, and the old things were now passed away. These small, fragile, erratic things they made now defined them, and thus an interdependence was born. The universe's first true circle, perhaps?
Creation is spiritual, no matter what it is that you are creating. In it lies the mystery of possibility, and possibility is where The Mystery dwells. Have faith that it's imperfect perfection will make itself known, and that you, the real you, will see it and never be the same.
(Very) Simply Wrapped Pt. 1
I'm growing my hair out. I want dreadlocks.


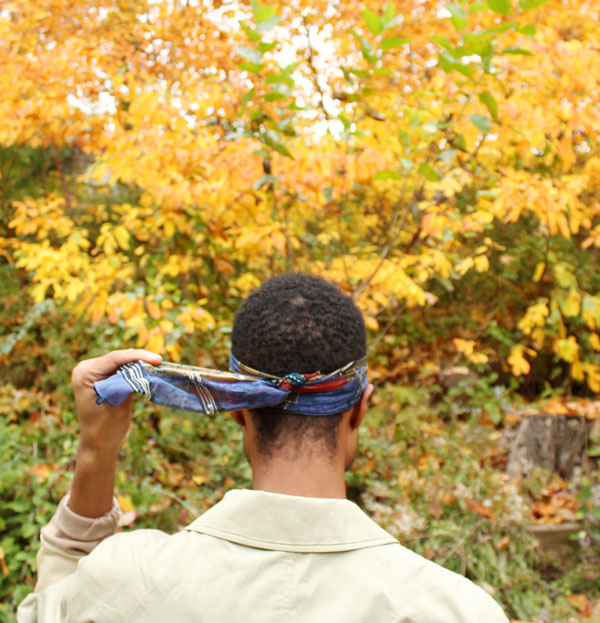
Hold the ends tight in front of you.
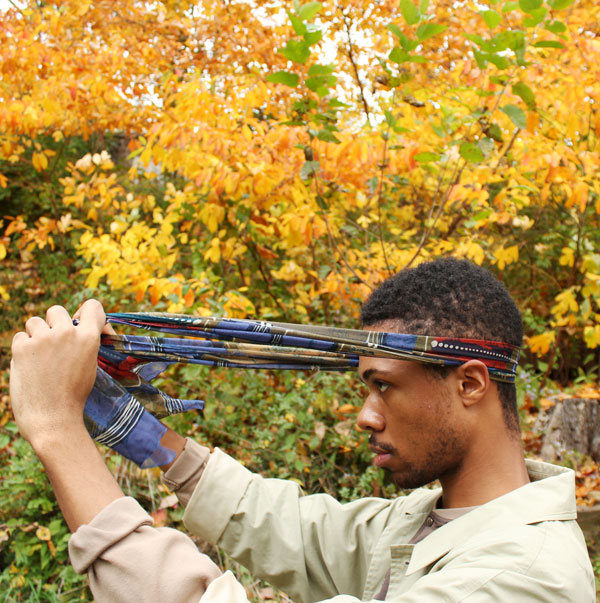


Until my hair grows, I plan on wearing a bunch of head scarves. I bought two on Etsy (this one and this one), and I also bought a few from Rags A Go Go in Manhattan.
Using a rectangular scarf ( about 63 1/2 x 11 1/4 inches), here's how I make a very, very, very simple head wrap. This works nice with flow-y, silky scarves, which are not too long.
Using a rectangular scarf ( about 63 1/2 x 11 1/4 inches), here's how I make a very, very, very simple head wrap. This works nice with flow-y, silky scarves, which are not too long.
Hold the ends tight in front of you.
Criss-cross.
Pull the ends back, behind you.
Make a comfortable knot.
Make another knot, then grab the right end and tuck it in the right side. Smooth it out.
Grab the left end, and tuck it in the left side. Smooth it out, too.
Adjust how it lays in your forehead, if necessary. Move it up, move it down or a combination of both.
Just like that. Simple, right?
King David
I've always connected with King David in the Bible. Of course, I was named after him, but I feel a deeper connection than the name. I resonate with his emotions; his moments of desperation, of longing, of joy. I connect with his bravery in the face of a giant, and his human weakness with Bathsheba.
I connect with his humanity, and the love God had for him in spite of and because of it.

I've been really into making paper crowns lately (see another one that I made for Etsy here). I like the idea of wearing a crown, not because of its implied superiority, but because it is distinct. It's like a reminder to the world that I am somebody, just like all of us are somebodies.
We are special precisely because we are who we are. Sometimes, it's good to remind yourself and others of that -- even if it's by wearing a woven paper crown.

Here's how you can make one. First, you will need the following supplies:

1). Fold one sheet of paper in half horizontally, then cut or tear them in half.
- A paper cutter or pair of scissors
- A few sheets of 8 ½ x 11 paper - I used Stardream Gold from Paper Source.
- Modge Podge or some other strong adhesive
- A ruler
- A pencil
- A bone folder


I cut three pieces to match the circumference of my head. It would be best to measure your head first to determine how many pieces you will need. Please also include a ½ inch seam allowance in your measurement.

2). Fold each of your cut paper pieces in half horizontally.

pieces.


4). With your ruler and pencil, draw vertical lines ½ inch apart from the top of your folded paper pieces to the vertical line you drew in the previous step, from edge to edge.


5). You will now need to glue your paper pieces together. Apply glue from the edge of one of your paper pieces to its first ½ inch vertical line you created, then place another paper piece on top, being careful to stay within this seam allowance.

Do this until all three are joined together.

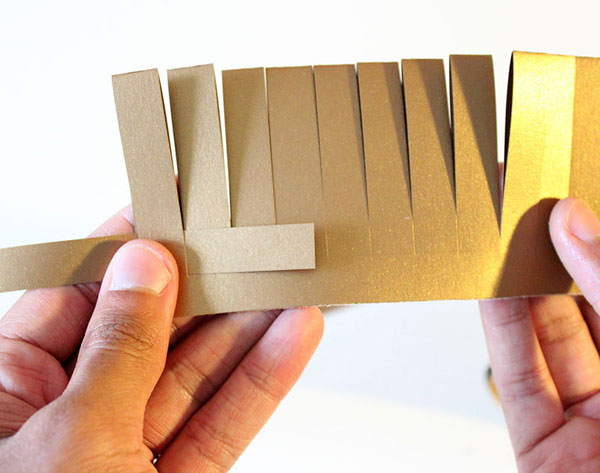
6). With a paper cutter or scissors, cut directly on each vertical ½ inch mark you created, stopping at the horizontal ½ inch mark. Be careful to not cut your paper all the way. This is your crown base.


7). Lay your crown base off to the side. Now, cut paper strips that are ½ inch wide and at least 8 inches in length.


8). Glue your paper strips together until they are about 4 inches longer than your crown base. You will need about 5 or 6 of these long strips for your crown.


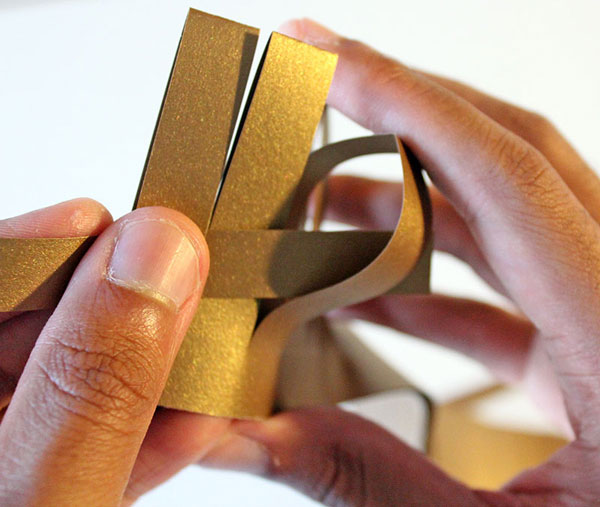
9). Now comes the weaving part! Insert one end of your paper strip into your crown base.

10). Then, pull it over the second cut strip, then through the third one. Repeat this pattern (over and through) until you reach the end.

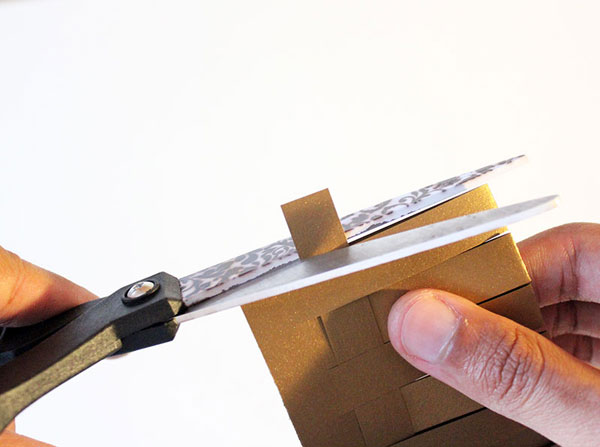
11). Cut off the end and fold it inside your paper base. Glue the end to the paper base to keep it secure.
12). Repeat this step until you reach the top of your paper base. You can glue the bottom of your paper base closed, if you’d like. I didn’t find this necessary, though.


13). Wrap your crown around your head to determine where you can glue it closed comfortably. Mark the appropriate end point with a pencil.

14). Apply glue to the end of your crown to close it.

15). ..and you’re done. You now have a wonderfully woven paper crown!

Halloween with Goodwill Pt. 2 - Bunny
Oh, hey.

A recent trip to Goodwill inspired this DIY bunny ear headpiece. I love it so much. Really, I do. This is the second item I made for the New York/New Jersey Division of Goodwill's Halloween Challenge, in which they asked a few of their favorite bloggers to create thrifted Halloween looks for under $30. See the first one here.
The headband and wire base for my bunny ears were purchased from Goodwill. I used paper and yarn that I already owned to add the finishing touches. Aren't they adorable?!

I love these ears so much that I decided to make a second pair. Written below is how I did it.
To make this project, I used:
- Thrifted wire stems. I'm not sure what gauge they were but I'm sure you can find something similar in a craft store.
- 8 1/2 x 11 inch paper from Paper Source (I used the Peacock color)
- Double-sided tape that is a half inch wide
- Cotton Ease yarn from Lion Brand (I used the Hazelnut color - Lot 39024D)
- Scissors
- A cheap headband from the 99 cent store
- A bone folder
- Modge Podge glue
- A plastic, disposable bowl
- A paintbrush
- A pair of needle-nose pliers (not shown in the image below)

These are the wire stems I purchased at Goodwill. They were a good find because they are thick yet pliable, and had a small circle at the top, which was very helpful for this project.

To begin making my bunny ears, I removed the sequins and beads that were attached to the stems.

Then, I bent the stem to create the bunny ear shape.

Next, I inserted the stem end into the other end that had a hole (see why it was helpful?), then used a pair of needle nose pliers to bend the stem end in the opposite direction, in order to keep it from coming out of the hole.


This is what both ears looked like after these initial steps.

Since I purchased a headband that had a few decorative elements on it, I needed to removed them in order to create my bunny ears.

I then applied a layer of double-sided tape to the top side of the headband, then of course removing the covered portion of the tape.


The tape will not hold the wire stems. Instead, I used yarn to secure my newly made ears to the headband.

I cut a long piece of yarn, then tightly wrapped over, under and through my bunny ears until they were as secure as possible. I did not want them to come off, and barely wanted them move.
The small bent portion of my wire ears that I made with my needle nose pliers was flat against the headband. This portion needed to be completely wrapped with yarn, too.

When the ears were tightly wrapped and secured to the headband, I tied a few knots in my yarn to secure it. Then, I cut the yarn ends, leaving about an inch or so left (these ends will soon be covered with more yarn).
When both ears were wrapped securely around my headband, I gently squeezed the wire ears in order to create more of an oval, bunny ear-like shape.


The next step is to cover the ears with paper. I used a small plastic bag to protect my counter space when applying the Modge Podge.

Next, I horizontally ripped two pieces of paper into strips.

To cover my ears, I poured the Modge Podge in a plastic bowl, then applied it with a brush to one side of one strip of paper. I then wrapped it around the ears. When doing this project (I hope you will try and make a pair for yourself), press the strip firmly together and as close around your wire ears as possible. Feel free to cut off any excess paper.


Be sure to also firmly press the glued paper strip snugly around your wire stem. You want to still maintain the wire's original shape that you previously created.

This is what one of the finished ears look like. I like how slightly distressed it looks.

I thought the back was a little too unsightly, so I cut a cover for it with a scrap piece of the paper, loosely in the shape of the ear. Then, I glued it to the back of the ear in order to cover the paper ends.


The next step is to cover the headband with yarn. I began at the bottom, covering my yarn end with yarn as I wrap as tight as possible. You could also tie a knot at the end, if you'd like. The double-sided tape did a good job of keeping the yarn from moving as I wrapped it.


Wrap from one end of the headband to the other. When you reach the bunny ears, you can secure them further, if necessary, by wrapping the yarn around their bases.

When I finished wrapping, I weaved in the yarn ends with an embroidery needle, then cut the ends closely to hide them.

And there you have it. Your very own handmade bunny ears!

They're so adorable that I really want to wear them outside as part of a regular outfit. Once I muster up the courage, I probably will :)

Halloween with Goodwill Pt. 1 - Flower Boy

Two weeks ago, the New York/New Jersey division of Goodwill asked a few of their favorite bloggers to take on a Halloween challenge. I had the honor of being included in their list. Each of us were given a $30 stipend to create a Halloween look using items found in one of their locations. I chose to go to their three-level Harlem location, one of my personal favorites in the city.
This challenge, while really fun, was especially difficult because Halloween is a new holiday for me. Raised in a strict Christian house, I never celebrated it growing up. Halloween was the devil's holiday (literally), so that meant us kids were either sitting at home watching t.v., or at church (one church we attended had an alternative called "Hallelujah Night," which is a whole other topic of discussion).
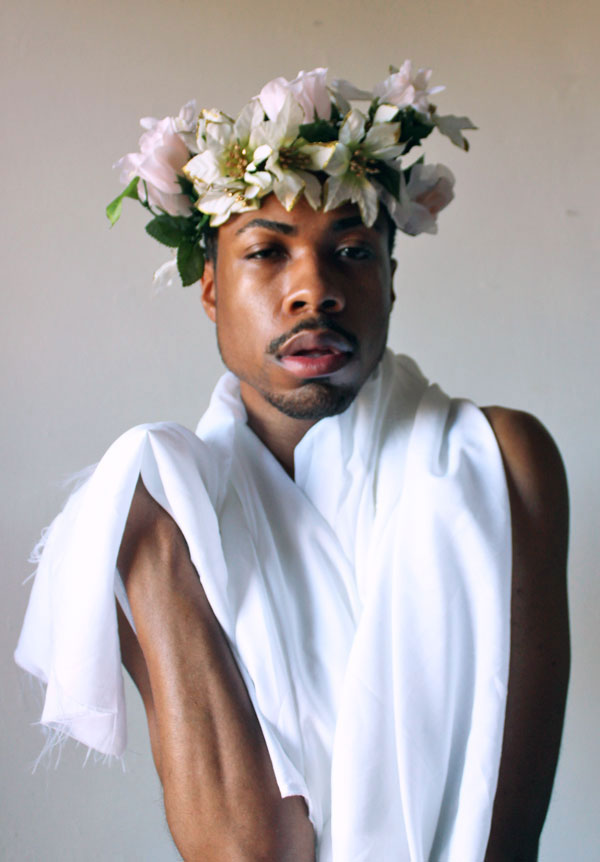
As a result, now that I'm older I still have a few reservations about Halloween. Not necessarily regarding its demonic inferences, but due to the idea of creating an extravagant, silly and/or scary costume for just one night's use. I decided to use this challenge, then, as a way to create fun photo props that I can use for Halloween and beyond. The first photo prop I created was a flower crown.

I feel like a greek god, a saint or something else classical and romantic. I like this type of beauty.

This inspiration for this in Goodwill came from an unusual source:

I spotted this wreath, but it was a bit too expensive for my budget. Instead, I found a few fake flowers to create my crown. I also found a beautiful silk red robe, but decided against it while creating the final look, opting instead for a simple white piece of fabric I had in my closet. Goodwill had a great array of material, though, so it's easy to recreate this simple look at their nearest location.


This headpiece was pretty easy to create. I found a few shimmery wire stems that served as a great base, then wrapped the wire stem of the fake flowers around them and each other until I had a size that fit my head. The flowers popped off their stems pretty easily, so I mixed the different flowers I found until I had a design I liked. Unfortunately, I couldn't use the beautiful red bouquet in the photo above because it was made out of a wooden and styrofoam material, and wasn't easily malleable. It's so pretty to look at though, isn't it?
I hope to create a proper tutorial for making a fake flower crown in the future. In the meantime, you can find a great tutorial using fresh flowers on Etsy, although the steps I used to create my version is different.


Once I'm finished wearing my new crown, it makes a great addition to my room.

Queen Zoé

I recently was given the opportunity to make a craft project for Etsy, the world's premier online marketplace for handmade goods, vintage and supplies! In the spirit of Halloween, I created a fun, simple and kid-friendly paper crown. My goddaughter Zoé took time out of her busy schedule to model it for me :)
Get the full tutorial here.
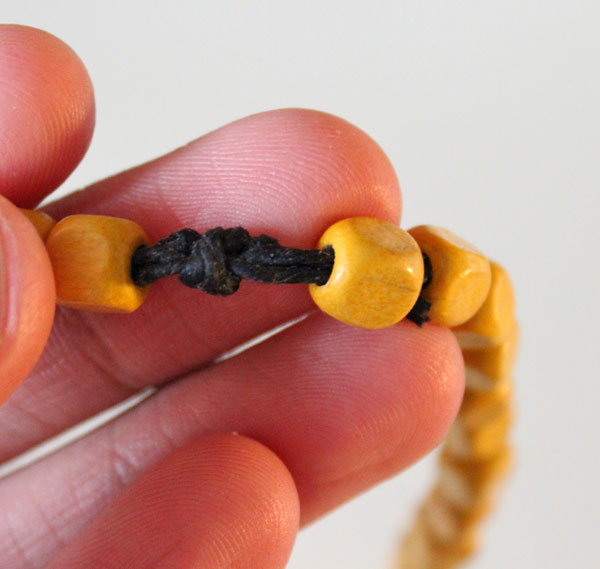
Beaded Necklaces
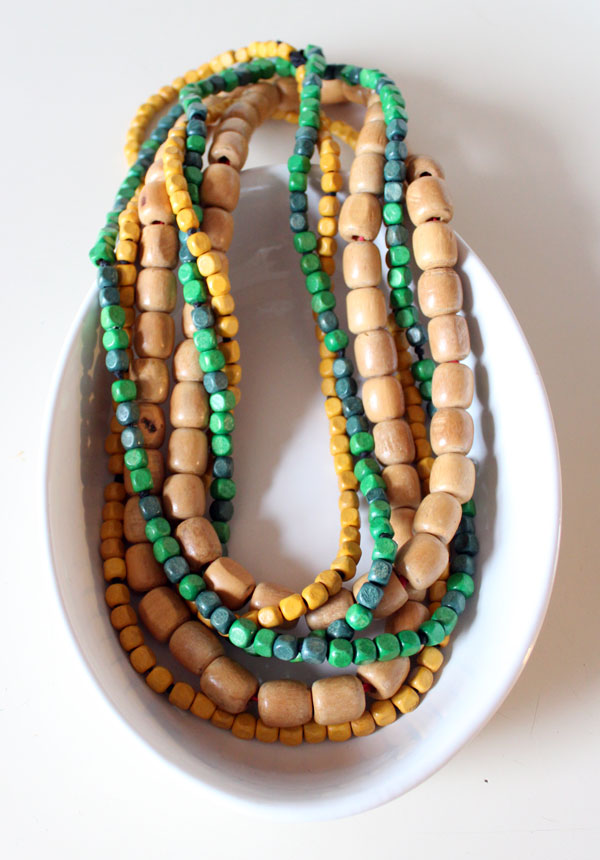
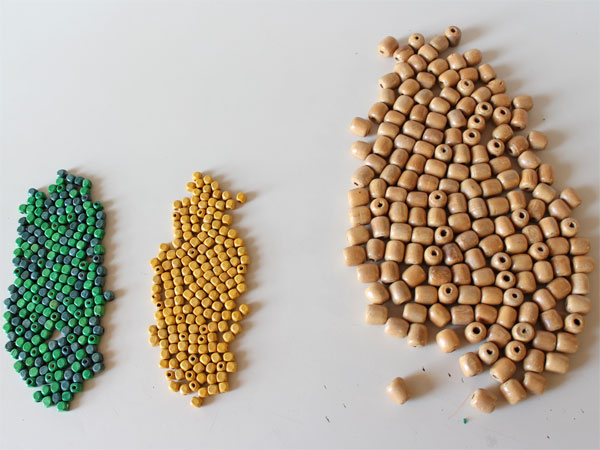
I have so many beads. Big beads, small beads and in-between beads of varied shapes and colors. They're currently filling a large jar in my room.
I have a growing need to use what I have, and to fill my hands with results. As a result, I need to use these beads somehow.

I decided to make three necklaces with three types of beads.
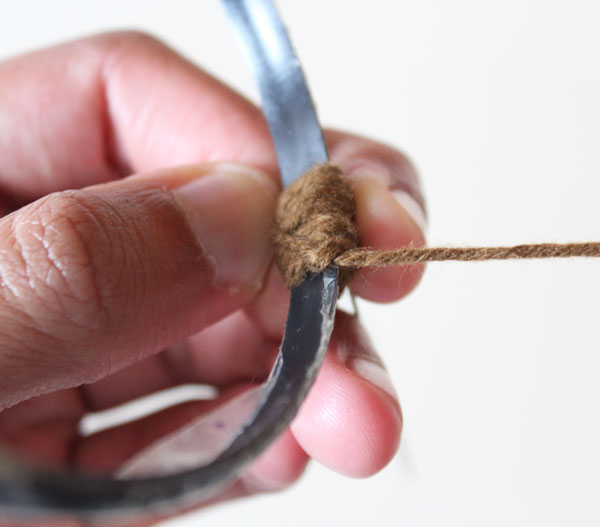
I used black waxed cording for the green and yellow beads. For the large brown ones, I used red hemp twine.

I cut two extra-long pieces for double the strength (I have a mild fear that my necklaces will break unexpectedly), then made a simple knot at the beginning.


I then put five beads on at a time, then made a knot directly below the last bead, like a pearl knot. Since the cord was relatively thick, I just alternated between pushing the knot up with my fingers and pulling the end of the cord in the opposite direction to get it as close as possible to the last bead, Sometimes, it took a few tries to get it just right, and oftentimes there was a little bit of space between the knot and the last bead, but that's alright.


To close the necklace, I made a couple of tight knots with each ends, then pulled the yarn ends into a few of the beads closest to it using an embroidery needle.

...and you're done!
